Getting Started
What is Print Perfect?
Print Perfect is a free tool that takes the guesswork out of 3D printer slicer settings. You upload your model file, tell it about your printer and filament, and it gives you a complete set of recommended settings — layer height, temperatures, speed, cooling, supports, and adhesion — all explained in plain English so you understand why, not just what.
Most slicer settings guides are one-size-fits-all. Print Perfect is different: it analyzes the actual geometry of your specific model and combines that with your specific filament and printer to give you settings tailored to your print.
There's no sign-up required, no account, and nothing is stored on our servers. Your model file is analyzed in your browser and never uploaded anywhere. It's completely free, powered by real manufacturer filament data from the Open Filament Database and Claude AI.
What you'll need before you start
Accessing the site
Print Perfect is currently in private betawhile we test and refine the tool. To access it, you'll need a beta access key. Enter it on the welcome screen — it's saved in your browser, so you'll only need to enter it once per device.

Uploading Your Model
Supported file formats
| Format | Description | Best for |
|---|---|---|
| .STL | The most common 3D printing format. One object per file. | Most prints — start here |
| .OBJ | Common format, slightly more complex than STL. | Single objects |
| .3MF | Modern format used by Bambu Studio and PrusaSlicer. Can contain multiple objects. | Modern slicer workflows |
File size limit
Files up to 50 MB are supported. For very large or high-polygon files, the geometry analysis may take a few extra seconds.
Tips for best results
What happens when you upload
The moment your file loads, Print Perfect automatically:
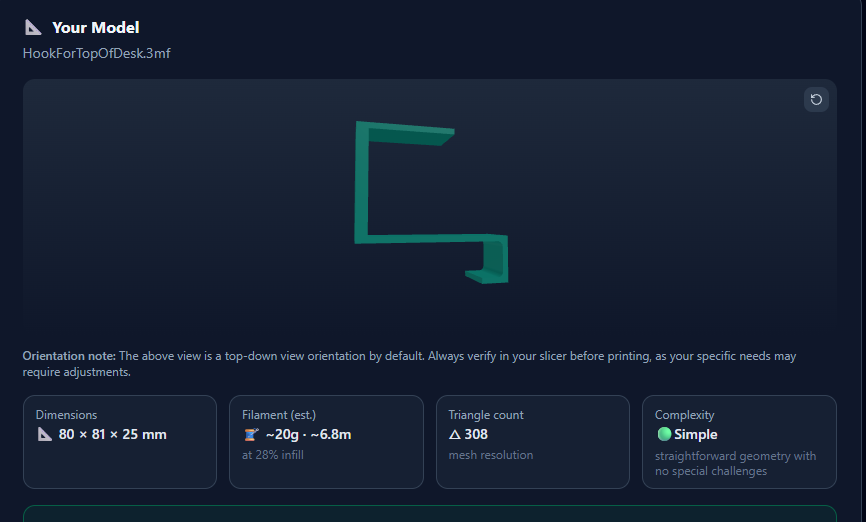
Understanding the 3D viewer
The viewer shows your model as it would sit on the print bed. Rotate by clicking and dragging. Zoomwith the scroll wheel. If the model was auto-oriented, a small note appears — this is just for analysis and doesn't affect how you orient it in your slicer.
Configuring Your Print
Selecting your printer
Choose your printer from the dropdown — 55+ printers are supported, organized by brand. If your exact model isn't listed, choose the closest variant from the same brand, or select “Other” for solid generic settings.
Filament type
| Filament | Best for | Notes |
|---|---|---|
| PLA | Everything — the default | Easiest to print. Start here. |
| PLA+ | Stronger everyday parts | Same ease as PLA, slightly tougher. |
| PLA Silk | Display pieces, gifts | Beautiful glossy finish. Slower and more fussy. |
| PLA-CF | Stiff structural parts | Carbon fiber reinforced. Abrasive on brass nozzles. |
| PETG | Functional parts | Stronger than PLA, slightly flexible, more heat resistant. |
| PETG-CF | Very strong structural parts | Carbon fiber PETG. Stiff and tough. |
| ABS | Heat-resistant parts | Warps badly — needs an enclosure. |
| ASA | Outdoor parts | Like ABS but UV-resistant. |
| TPU | Flexible parts | Rubber-like. Great for phone cases and gaskets. |
| Nylon | Wear-resistant parts | Tough but absorbs moisture quickly — store carefully. |
| PC | High-stress parts | Extremely strong. Needs very high temperatures. |
| Resin | SLA/MSLA printers | Completely different printer type — FDM settings don't apply. |
Filament brand and the Open Filament Database
Enter your exact filament brand name (e.g. “Bambu”, “Hatchbox”, “Prusament”, “eSUN”). Print Perfect searches the Open Filament Database — a community-maintained registry of real manufacturer filament specifications.
Nozzle diameter
| Diameter | Best for |
|---|---|
| 0.2mm | Ultra-fine detail: miniatures, intricate ornamental parts. Very slow. |
| 0.4mm | The standard. Best balance of speed and quality. Start here. |
| 0.6mm | Faster prints with slightly less detail. Great for large functional parts. |
| 0.8mm | Fast and strong. Draft prints and structural parts. |
Most printers ship with a 0.4mm nozzle. If you haven't changed yours, select 0.4mm.
Bed surface type
Your bed surface affects the recommended bed temperature and adhesion settings. Common surfaces include PEI Textured (excellent all-round adhesion), PEI Smooth (better for flexible materials), Glass (reliable, needs slightly higher temps), and Bambu Lab's printer-specific plates — each optimized for different filament families.
Room humidity (auto-detected)
If you share your location, Print Perfect reads your current local humidity from a weather service and fills it in automatically. No personal data is stored.
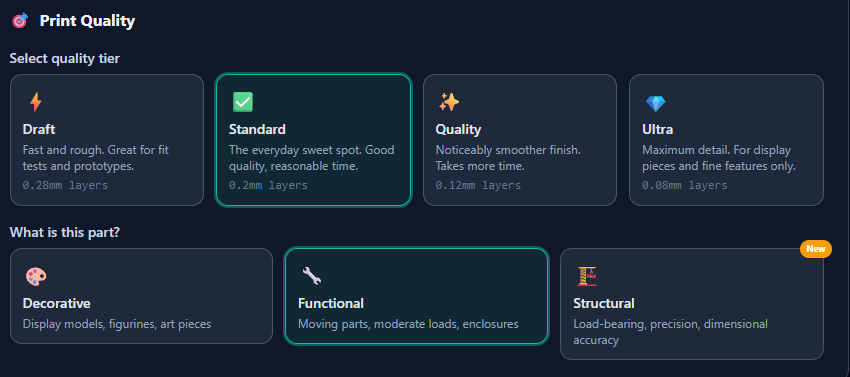
Print quality tier
| Tier | Layer Height | Speed | Best for |
|---|---|---|---|
| Draft | 0.28mm | Fast | Fit tests, prototypes, things you'll reprint |
| Standard | 0.20mm | Moderate | Everyday prints — the sweet spot |
| Quality | 0.12mm | Slow | Visible parts where surface finish matters |
| Ultra | 0.08mm | Very slow | Display pieces, fine detail, maximum quality |
Functional vs. decorative
Checking “Functional part” tells Print Perfect to prioritize strength. This adds +10% infill density and +1 wall count, making the part tougher at the cost of slightly more filament and time.
Use this for brackets, hinges, clips, tool holders — anything that will be stressed or under load. Leave it unchecked for figurines, decorations, and display models.
Understanding Your Results
The filament showcase card
When your filament brand is found in the Open Filament Database, a Filament Profile card appears at the very top of your results. It shows the actual manufacturer-specified nozzle and bed temperature ranges, filament diameter, density, and a plain-English blurb about the material. This is the data your recommendations are based on.
Estimated print time
The print time estimate shows as a range (e.g. “2h 30m – 3h 15m”). Use it for relative comparison — Draft vs. Standard — rather than precise scheduling. Your slicer will give you the definitive time after slicing.
Recommended settings panels
Your results are organized into five expandable panels:
Temperature
Nozzle temp and bed temp calibrated for your filament type and brand data. Each setting shows a confidence badge.
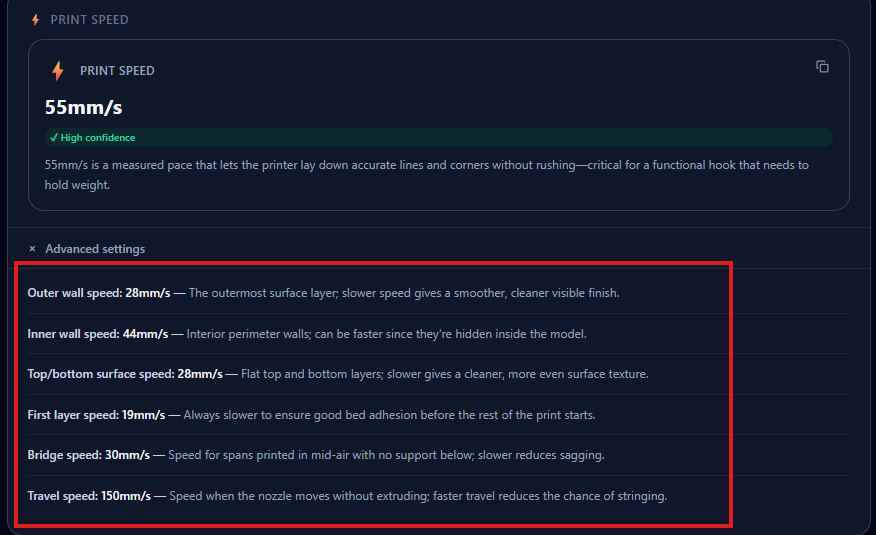
Print Speed
General print speed plus a slower first-layer speed. The first layer speed is critical — don't change it.
Cooling Fan
Fan percentage for your material. PLA needs lots of cooling; ABS and ASA need almost none to avoid warping.
Supports
Whether supports are needed based on your model's actual overhangs. Tree supports use less material and are easier to remove.
Bed Adhesion
None, Brim, or Raft — chosen based on your model's footprint and the material's warping tendency.
Confidence scores
Advanced settings
Each panel has an expandable Advanced settings section with values like outer/inner wall speeds, support Z distance, elephant foot compensation, and fan ramp-up behavior.
Saving and Sharing
Your print history
Every successful analysis is automatically saved to your print history (click the clock icon in the nav bar). The last 5 sessions are stored locally in your browser — nothing is sent to our servers. Click any history card to review the full results.
Rating your prints
After the print finishes, come back to the session (via History) and mark the outcome: ✅ Success, ⚠️ Partial, or ❌ Failed. This builds a personal record of what works for your printer over time.
Side-by-side comparison
On the /history page, select Compare on any two sessions to see them side-by-side. Settings that differ are highlighted in amber — making it easy to spot what changed between a successful print and a failed one.
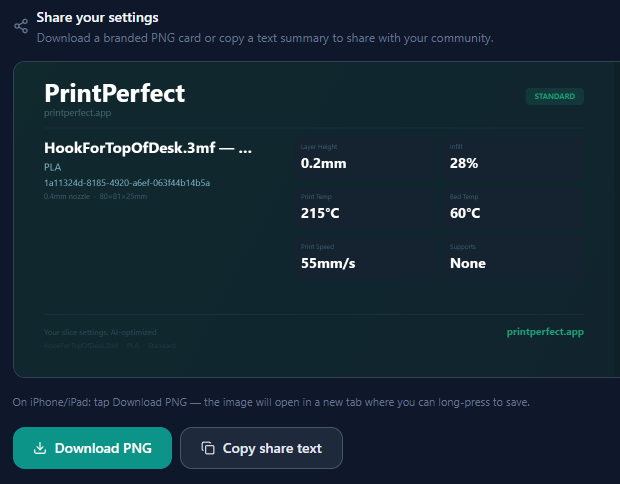
Sharing your results
The Share Card is a downloadable PNG image summarizing your settings, formatted for posting on Reddit (r/3Dprinting), Discord servers, or Facebook groups. Click Download Share Card on the results page to save it.
Printer Profiles
Saving your printer setup
Click Save as Profile on the configuration form to save your current printer and filament setup as a named profile. Up to 10 profiles can be saved, stored locally in your browser.
Profiles save: printer model, filament type, nozzle diameter, and bed surface. Set one as your default and it pre-fills automatically every time you open the site.
localStorage. They will not save in incognito/private browsing windows. Use a regular browser tab to retain profiles.Tips for Beginners
Tips for Intermediate Users
Frequently Asked Questions
Is my model file stored anywhere?
Why does my print time estimate seem off?
The filament database didn't find my brand. What happens?
My 3MF file showed a multi-object warning. What should I do?
Can I use these settings directly in my slicer?
Does Print Perfect work for resin printers?
Why do I need an access key?
Does Print Perfect cost anything?
How accurate are the recommendations?
How many analyses can I run per day?
Changelog
| Version | Date | Summary |
|---|---|---|
| v1.5.0 | April 2026 | Two-tier KV/local storage; tip jar side-by-side redesign |
| v1.4.0 | April 2026 | Beta key gate; dynamic admin settings panel |
| v1.3.0 | April 2026 | Filament live preview panel; expanded tip jar |
| v1.2.0 | April 2026 | Print history; share card; outcome flags; comparison view |
Print Perfect is a free tool built by a maker for makers.
← Back to Print Perfect